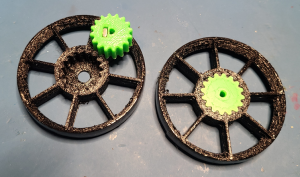
Tyler Wheels
Tyler Wheels are a two-part 3D printed design that Tyler Bletsch came up with, featuring a silicone tread applied via a 3D printed jig. If you give a desired diameter in #3d-printing on Discord, Tyler will print some for you.
Printing
Link to OnShape CAD. Link to pre-made STL files to print wheels, hubs, and the entire jig tool.
Printing wheels
To print the wheels, print one hub in PLA and one wheel in TPU. There are several pre-exported STL files in the linked folder:
- n20 hubbed wheel v5 - hub.stl: The standard hub used by all wheels.
- n20 hubbed wheel v5 - wheel ##.stl: Normal wheels, diameter ## millimeters.
- n20 hubbed wheel v5 - wheel ## beefy.stl: Especially large diameter wheels with more stout spokes and rim, diameter ## millimeters.
- n20 hubbed wheel v5 unibody - wheel ##.stl: Especially small diameter wheels with no spokes, diameter ## millimeters.
Printing the spinning jig
The spinning jig is a tool used to apply silicone to the surface of the wheels in a uniform tire bead. See below for usage information. To make, you'll need:
- One printed base, either of the following:
- spinning mould - all 3d v2 - base.stl: Normal base for wheels up to around 100mm. Print on its back.
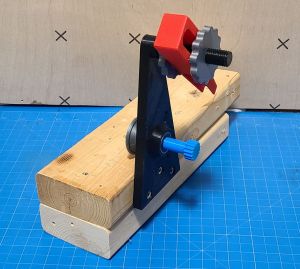
- spinning mould - all 3d v2 - base (sidemount).stl: A special base with no bottom, meant to be screwed into some wood (e.g. a pair of scrap 2x4s) -- this allows wheels up to 140mm. Print on its back.
- One axle: spinning mould - all 3d v2 - axle.stl. Print with spline (where the wheel goes) down, use high number of perimiters and infill.
- Two hand nuts: spinning mould - all 3d v2 - hand nut.stl. Print flat.
- One knob: spinning mould - all 3d v2 - knob.stl. Print on its back.
- One tool: spinning mould - all 3d v2 - tool.stl. Print on the flat side that faces the user (so the part that touches the wheel is facing up).
- Two 608 "skateboard" bearings
Assemble as shown, with the two 608 bearings going in either side of the base, the axle going through them, then being secured with the threaded knob. NOTE: The knob is left-hand threaded, so you turn it left to tighten (so that normal use of the device doesn't thread off the knob). If you are left handed and want it the other way, just print the base, knob, and hand nuts mirrored in your slicer.
Install a hand nut, the tool facing away from you, and a second hand nut on the upper threaded shaft. Tighten the two hand nuts against the tool to hold it. It will be adjusted during use (see below).
The normal base can be used as-is, but the sidemount base (used for very large wheels) has to be screwed to something. I used a pair of 2x4s screwed together to raise it up and add mass (see pic).
Assembling
You should watch the videos, but the short version is:
- Goop the wheel:
- Install the wheel onto the axle of the spinning jig's axle.
- Adjust the jig tool over it, tightening the two hand nuts to hold it in place.
- With a caulk gun loaded with clear silicone (e.g. Food Grade NSF FDA RTV Silicone Sealant Adhesive), apply silicone to the wheel tread while rotating the wheel forward into the tool. The tool will shape the silicone, and collect a fair amount of excess.
- When the wheel is uniformly coated in silicone wheel tread, carefully lift the tool from the wheel, ideally while turning it, so the wheel surface is mostly unaffected. Clean up any marring, and if you're not happy, lower the tool again to reshape the silicone. You have plenty of time before it cures.
- Carefully remove the wheel from the axle, and leave it in a safe place to cure.
- Assemble the wheel:
- Insert M3 square nut into hub, press in with a little flathead screwdriver.
- Insert the hub into your wheel with the nut slot facing into the wheel, making sure the screw hole in the hub matches the one in the wheel.
- Install an M3x6mm grub screw into the wheel+hub with a 1.5mm Allen key.
- Install the wheel onto the N20 motor:
- (Skip this if just doing a test fit) If ready for final installation, apply Loctite Blue to prevent vibration from walking the screw out. To do so:
- Using a 1.5mm Allen key, screw the grub screw all the way in until you can see much of it through the shaft hole.
- Apply a drop of Loctite onto the top of the shaft hole.
- Tap the wheel repeatedly so the Loctite goes down the shaft hole and into the threads of the exposed grub screw.
- Unscrew the grub screw until it's back to being recessed in the hub nut.
- Ensure the grub screw isn't blocking the shaft hole, and put the wheel onto the N20 axle.
- Tighten the grub screw with a 1.5mm Allen key.
- (Skip this if just doing a test fit) If ready for final installation, apply Loctite Blue to prevent vibration from walking the screw out. To do so:
Videos on how to use the spinning jig to make wheels:
Hey, my N20 motor shaft doesn't have a flat that goes its full length!
Your motor should look like this:
If it looks like this, your wheel will have a bad time:
In this case, see Extending the flat on N20 motors!


